Tuesday, 4 March 2014

Mush Valentines Card

Hi All

So Twinny asked me to make her a 'mushy' card for her boyfriend for valentines day. So I did:


 I'm quite liking this slightly more minimalist look at the moment it seems very clean

With an appropriately unmushy sentiment inside, just in case...

Adding to MIM

Speak Soon
Nat -x-

Monday, 3 March 2014

My Twinny's Birthday Card

Hi All!
It was mine and Twinny's birthday a couple of weeks back and just thought I'd share this card I made for her:

 Quite simple really, just utilising my most favourite of Cricut Cartridges: Storybook!


With a spellbinders nestie frame. The image is of a character she created for me when we were about 15 I think who is affectionately know as MSSC or Mad Scary Stalker Cat (of course it is) and so I thought I'd finally give it a go and try and draw it myself, which I did with a quickie glue pen and the covered it in glitter! Hooray for glitter!

I shall be sharing this at MIM hello all, it's been a while.

Speak soon
Nat -x-

Tuesday, 26 November 2013

Christmas Glasses

I've been playing around recently with decorating glasses with Polymer Clay, and as Christmas is fast approaching I thought why the hey not.

 I may have got a little carried away with my Snowmen as they have little carrot noses, scarves, hats, coal eyes and buttons and little holly on the hat, so probably not the most practical for actually washing but once I got started I fell in love with them, so I just kept going.


 I also made some Holly glasses. I don't actually have a holly cutter so I made my own with an oval cutter, but cutting an oval and then just cutting overlapping smaller sections so each leaf is unique, adding a little veining and 3 little red balls for berries.

I'm very pleased with how these turned out, and made some candy cane swirled glasses which I shall upload soon and I've also been playing around with some etched designs which I'll try and get up soon too.

Speak Soon
Nat -x-

90th Birthday Invitations

Good Evening All,

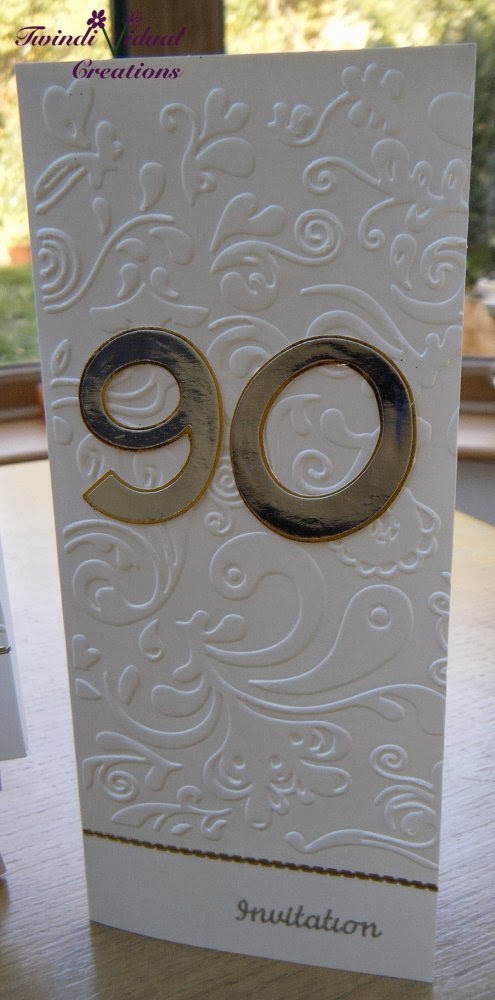
So it's my Nan's 90th Birthday this year, and my Mum asked me to whip up some invites for the family, so I thought I would just do something simple, so I did and I was really pleased with how they turned out.

 I just cut out the different 90's using my Cricut and different fonts just to mix it up a little, and cut them out of silver mirror board with gold shadows.
 I embossed straight onto the DL sized cards, the embossing folder didn't reach quite to the bottom of the card so I just put a small border peel off across the dividing sections and added an Invitation peel off on the smooth section, stuck the 90 on and taa daa!!

All finished and ready to go!

Linking up to Make It Monday

Speak Soon
Nat -x-

Thursday, 14 November 2013

Creating a Deathstar Wedding Seating Plan

Hi All
I added a post a couple of months back with the Death Star Table Plan I made for my friend's wedding and as I took a lot of piccies while making it I thought I might as well share them.
 So it all started with a beach ball.  This was the 4th base I tried as in true Goldilocks fashion the others were all too big or too small and this one turned out to be just about right in the end. (I believe it was a 36" beach ball if anyone else is interested in creating their own.
 Then it was on with the layers of paper mache, just using good old fashioned flour and water and lots of newspapers.  I did around 3 layers (it's perched on a wine cooler), and then deflated the balloon and took it out and cut a hole around the one that was already there at the base.
 It was originally intended as a Pinata so before I closed it up I cut up ALOT of tissue paper and put inside as well as putting the ribbon up through the top for it to hang through.
 Then I made the laser bit by doing a couple of layers over Paper Mache over a bowl and then hot glued it in place before covering the whole thing again with around another 3 or 4 layers.
 There's the beach ball deflated beside the deathstar.
Once I was happy with the amount of layers and confident that it would be strong enough it was time to paint. So i started off with about 3 layers of a grey primer to cover up the newprint and ensure it wasn't all going to flake off. Then i did a couple of layers of silver metallic paint, obviously letting each layer dry in between.  Then I had different widths of masking tape and roughly followed a deathstar picture I had but pretty much just did what I thought looked right, then it was back out into the garage and sprayed over the whole thing with a darker metallic grey.
 
And this is what it looked like when all the masking tape was removed, hanging nicely in space on it's trusty coat rack (all very technical stuff)


 Then it was just a case of adding all the details. So I got put some black sating ribbon around the centre, adding the detailing of the laser using a black Sharpie and added lots and lots of dots using a white writer paint so it already has a nozzle and some glitter glue again so it was just a case of tabbing around.


And voila a finished deathstar.  I also added 12 jump rings all around the base and glued them in the holes which is where the table plan hang off when it was in place.


Hope you enjoyed the process

Sharing today with Make It Monday

Speak Soon
Nat -x-

Tuesday, 17 September 2013

Wedding Card

Hi All,

Just wanted to share the card I made for my Best Friends Wedding at the weekend. They had a Green and White theme so that's what I went for too.


 You can just about make out in the above picture that I embossed the central panel using clear embossing ink and powder just to add a little extra texture. As well as the foiled sentiment for that extra special touch.
 I tried to keep it fairly simple just adding highlights of the green colour, here and there.
 I also designed and cut out their married names using my Cricut, embossed and highlighted with Crushed Olive DI and placed these down the side of the central panel.
I finished off with a few flowers, some ribbon and a little bit of bling.

I shall be linking up to Make It Monday and Divas by Design.

Speak Soon
Nat -x-

Monday, 16 September 2013

Death Star Wedding Table Plan

It was my Best Friend's Wedding this weekend which went beautifully and also meant I could breathe a sigh of relief as the Death Star Table Plan was finally finished and also went down a storm - phew.

I did originally design it so it could hang up but in the end we put in on a hat stand which worked perfectly and also gave it that extra support with the actual places and tables for people to sit at hang around the stands pole. 

 Here are a few more close up of the actual names. The Table Names themselves were based on Star Wars which is where the idea of the Death Star came from so each person has an individual scalloped circle with the symbol of their table on one side and their name and table name on the other, each table was then tied together with little bows and hung individually from little rings that I placed at the bottom of the Death Star.
Oh it was also designed to be a Pinata so it is filled with confetti but my Friends decided they didn't want to smash it after all.
I shall be putting another post up soon with pictures of the making process as it took a while, but that's for another time!

I shall be sharing with Make It Monday and Divas by Design

Speak Soon
Nat -x-